T.J. Alumbaugh


T.J. Alumbaugh

can't stop/won't stop writing Python @ Continuum Analytics
Currently living in Austin, TX.
My thoughts here are my own.

"Celery Event Reporting: Getting Your Jobs on that Hotline Bling."

There are two things we can all agree on: 1. Drake dropped a massive hit with his single “Hotline Bling” and 2. celery is a great distributed computing library for a wide range of needs. That being said, celery (much like Drake’s complex relationship status as described in his song) is not for the faint of heart. celery can feel too configurable: it has all sorts of bells and whistles, but sometimes it can be difficult to know how to get it to do what you want. One necessary use case is reporting: what your are jobs doing and what celery is doing with them. The default settings aren’t great for this so if you don’t set things up correctly, just like Drake’s lament about his erstwhile girlfriend, you will be in a state of wondering what’s going on. So let’s get them on that hotline bling.

Here we just want to accomplish two things:

1. Set some reasonable configuration settings for a basic use case of distributed task execution

2. Monitor celery running live to verify that it is performing as desired

For my case, I want to execute Numba-driven Python calculations that take quite a bit of number crunching. Each job has the following characteristics:

1. significant memory high watermark
2. >= 20 seconds run time
3. CPU-bound for most of the time

It turns out that celery does certain things by default that are not good for these kinds of jobs. In particular, celery workers by default will attempt to grab a few jobs from the queue at once, instead of just grabbing one job at a time. This may seem odd, but the idea is that the overhead of going to the queue and asking for jobs is then amortized over several job executions. For my case though, job execution time dominates over any latency of going to the queue, so I want to turn off this behavior. “Turning off” the prefetch behavior is really the same thing as setting the prefetch setting to 1, so you have to give celery this setting when you start up:

CELERY_PREFETCH_MULTIPLIER=1 celery -A celery_tasks worker -l info

What about concurrency? The celery docs say that the default setting here is to set the number of workers to be the same as the number of CPUs reported by the OS. For my jobs, I’m mostly CPU-bound, so that’s a reasonable setting. If your jobs are often sitting around waiting for network traffic or the like, you might want to set that number higher. The setting is CELERYD_CONCURRENCY.

But now I want to load test and prove that celery is doing what I want (prefetch setting to 1 and max concurrent jobs set to number of CPUs). If I get this wrong in production, too many jobs will launch and I’ll get memory exceptions (due to my high memory watermark). Much like Drake, my level of trust here is low. In the documentation for event reporting, you will find all sorts of interesting ways to tweak the reporting of events, but you won’t find the actual magic command you have to enter so that you can actually see what your jobs are doing.

The trick is to tell celery that you would like to enable events, and then it will allow you to view tasks as they come in with the events command:

$ celery -A celery_tasks control enable_events
$ celery -A celery_tasks events

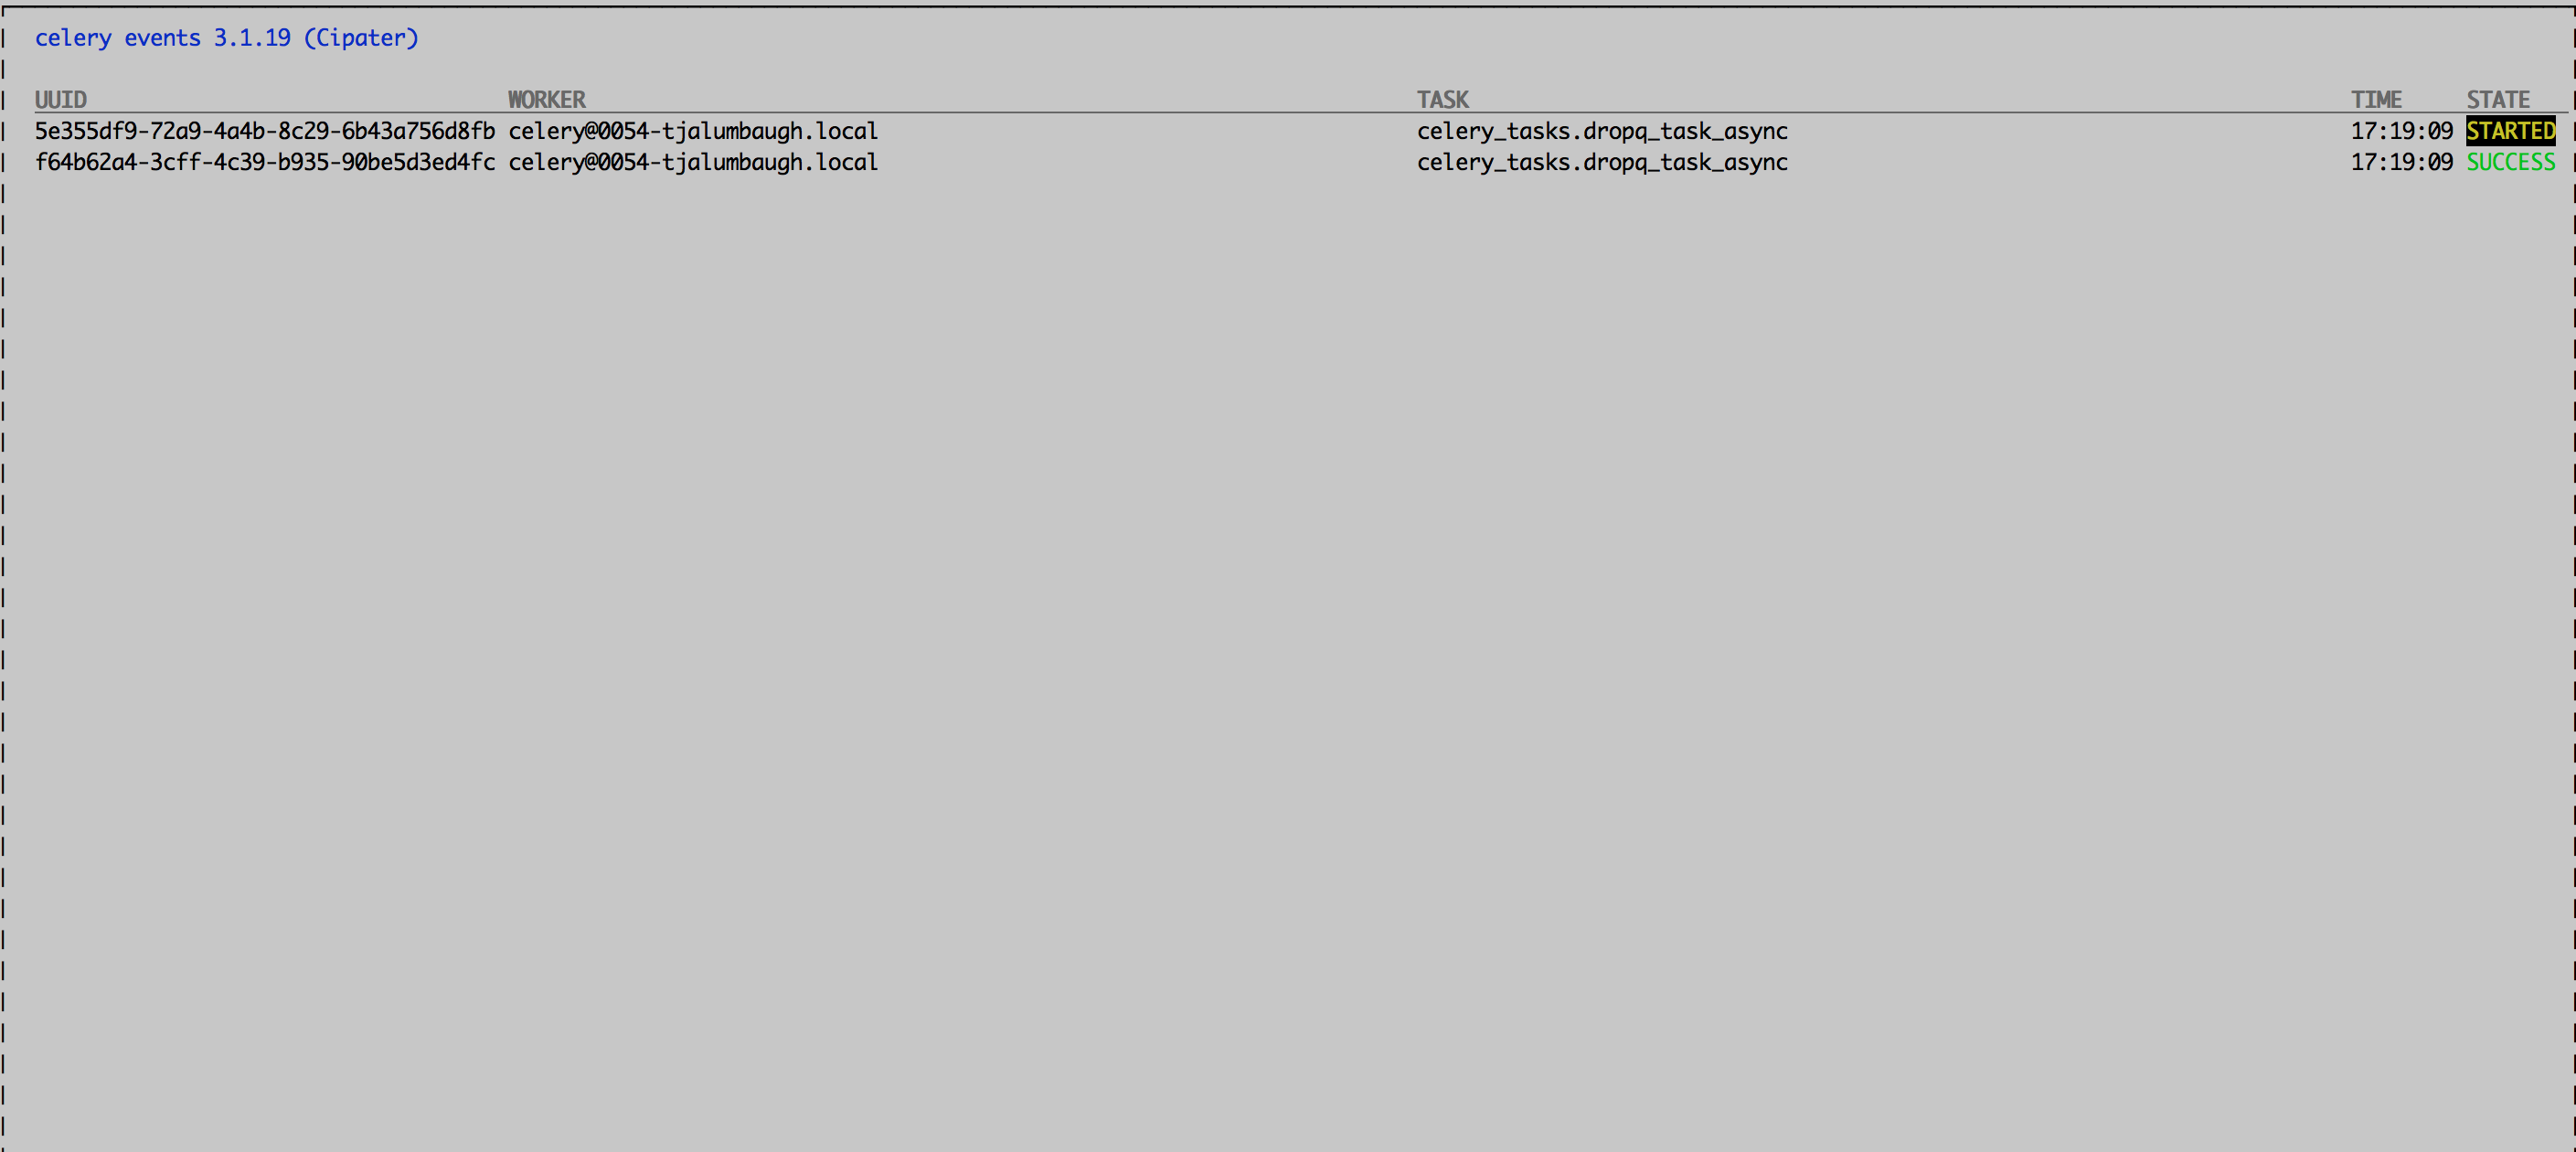
This will bring up a screen that will show you exactly what’s going on as jobs are run on your system:
What about when your jobs complete? Celery provides a number of mechanisms for you to figure out that those jobs you thought were so well-behaved were actually living a wild wild nightlife. It turns out that my original way of handling generated celery tasks works, but only for certain cases. So here is what I originally did:

Step 1: After launching an asynchronous task, just return its job ID and use that as your handle for the job.

handle = my_task.delay(arg1, arg2)
return str(handle)

Step 2. At some later time, create a fresh AsyncResult object from that job ID.

# Use the job_id to create an AsyncResult and get its status
result = celery_app.AsyncResult(job_id)
if result.ready():
    return resultsresult

The worst thing about this solution is that it works some of the time. This result object will respond correctly to ready() as long as the only thing that ever happens to your job is that it executes succesfully. If your job does anything other than succeed, this technique will always tell you that your job is in the PENDING state. Forever. With no error message. So, I gathered that I shouldn’t do that.

Instead, you should keep track of the actual object returned by the delay method; here I use a dictionary:

job_handle = my_task.delay(arg1, arg2)
# Keep the handle!
running_jobs[job_handle.id] = job_handle

This object will hold the proper status of the task (e.g. ‘SUCCESS’, ‘FAILURE’, ‘PENDING’, etc.) and even give you the traceback if an exception is raised:

# Now it's time to check if the job is done
task = running_jobs[job_id]

if task.ready():
    if task.successful():
        return results.result
    elif results.failed():
        return results.traceback
    else:
        # Nothing should get here
        raise

So, with those two techniques (enabling/viewing events and keeping track of generated AsyncResults objects) you’ll stay in touch with all of your celery jobs and know exactly what they are up to.

This will likely lower your angst level about your celery jobs and generally help you avoid having to do things like this:

via GIPHY


Numpy changes in 1.10

Casting behavior is different in numpy v1.10, so if you’ve gotten away with ‘unsafe’ casting up until now, you are in for a rude awakening with numpy v1.10.

Previously, this kind of code was OK:

>>> import numpy as np 
>>> x = np.array([1000], dtype='int64')
>>> x *= 1.02
>>> x
array([1020])

This is because the default casting behavior was “unsafe”, so it was OK by default to take the floating point result of the multiplication and store it back into an integer dtype. In Numpy 1.10, the behavior has changed to a default rule for casting called “same_kind”. This allows one to, by default, cast a float64 to, say, a float32, with no error generated, but not from float64 to int64. Here’s an excerpt from the release notes from 1.9 detailing what’s going to change in 1.10:

In a future version of numpy, the default casting rule for UFunc out= parameters will be changed from ‘unsafe’ to ‘same_kind’. (This also applies to in-place operations like a += b, which is equivalent to np.add(a, b, out=a).) Most usages which violate the ‘same_kind’ rule are likely bugs, so this change may expose previously undetected errors in projects that depend on NumPy. In this version of numpy, such usages will continue to succeed, but will raise a DeprecationWarning.

My usage of this feature was intentional, but I confess it was probably not the safest behavior to rely on.

To get the same behavior in v1.10 that you got with numpy v1.9 and earlier, you have to now explicitly specify that you want the unsafe casting behavior. This seems reasonable, but there’s no way to spell that out with the inplace syntax, so you have to use an actual function call with the ‘out’ parameter. With that syntax, you can now stick in the desired keyword argument:

>>> import numpy as np 
>>> x = np.array([1000], dtype='int64')
>>> np.multiply(x, 1.02, out=x, casting='unsafe') 
>>> x
array([1020])

This is backwards compatible syntax that actually does make it more explicit that you are chopping off a floating point value to put it in an int type. It’s a bit uglier, in my view, but that’s pretty much the only downside I can see.

Ok, numpy, you win. I humbly accept your reproof and promise to be more explicit about my unsafe casts in the future (since I basically have no choice!).


Creating Python Extensions on Windows

One of the great things about CPython is its ability to integrate well with other languages. For example, it’s very common to integrate some existing C or C++ code with Python. There are a LOT of choices out there for doing this. A less common choice, but still extremely useful, is integrating Python with Fortran. For example, the underlying routines in SciPy are Fortran code. You can find some tips out there for building C/C++ extension packages for Python on Windows, but I haven’t found very much out there for Fortran. So, my pain is your gain.

The steps I present here are what would occur to someone who has a more Unix-y mindset. If that is foreign to you, then you likely already understand Windows enough that this page will be a bit redundant.

First let’s get some Fortran code we want to build as a Python extension:

Some Fortran code

Well, that was easy. I also included a basic “setup.py” so Python knows how to build the extension.

Next to compile Fortran, you need a Fortran compiler. In this case, we want one that works on Windows. Amazingly, these exist. In addition, because we need to compile code that adheres to the C API of Python, we also need a C compiler.

Q: How do I know which compiler I should download?

Answer: First you should find out which compiler (and version number) was used to compile your CPython. Then you need to make sure that the Fortran compiler you select is compatible with that C compiler version.

Let’s look at the version string for our default version of Anaconda Python 2.7:

>>> sys.version '2.7.10 |Continuum Analytics, Inc.| (default, May 28 2015, 16:44:52) [MSC v.1500 64 bit (AMD64)]'

Q: How am I supposed to know what that means?

That’s a good question. I really have no idea. I found the answers by looking at this StackOverflow post on Visual Studio versions, which contains this helpful snippet:

Visual C++ 2008 MSC_VER=1500

Based on that, I know this Python was compiled with MS Visual Studio 2008.

Here is another important tip that can save you time and confusion. On Windows, the 64-bit version of the x86 instruction set is referred to as “amd64” or “AMD64”, instead of x86-64. However, in Intel compilers, I just don’t think they could handle having a config option with “AMD” in it, so they call the 64-bit option “intel64”. Great stuff, right?

Q: So, can I yum install Visual Studio or what?

Answer: No. You actually have to google “Download Microsoft Visual Studio 2008”. I did that and the first link is to a download page that downloads a Powerpoint presentation talking about Visual Studio 2008. Great job, everyone who made that happen.

I installed the Intel Fortran compiler, which is officially called the “Intel Composer XE 2013 SP1”. Could have also gone with “ifortran vXX.X”, but they didn’t ask me.

Are there any more pitfalls that can cause this to fail?

Answer: Yes, thanks for asking! The Intel Fortran compiler doesn’t work with Visual Studio Express, so you can’t get away with using those versions, which is often the recommended path for folks who want to compile Python extensions on Windows.

Q: Ok, I've paid for both the Visual Studio C compiler and Intel Fortran compiler. So now, I can just do as follows:

  • git clone {my Fortran code}

  • Open the Anaconda Command Prompt

  • activate a conda environment with numpy and Python 2.7

  • python setup.py build

  • Live in the bliss of compiled Windows object code for the rest of your days.

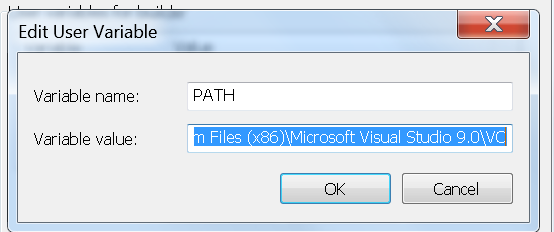
Answer: Not even close, friend. To start, you will probably have to modify your PATH to make sure that you can execute cl.exe (the MS compiler) and ifort.exe (the Intel compiler). This is just like modifying your PATH on a Unix system, except you have to type everything inside this little box.

Awesome.

There’s still a whole bunch of things that can go wrong, but, basically, if you have gotten both compilers installed on your system, you just need to make sure they are configured correctly and you can probably figure out the rest.

For MS Visual Studio, it turns out that there is a master config batch script that lives in the VC directory called vcvarsall.bat. Open it up and make sure that the section for amd64 is pointing to another batch script that exists and is doing reasonable things.

On the Fortran side, open the Intel compiler prompt window and execute the main configuration script, setting the platform to 64-bit and the version of Visual Studio to talk to as VS 2008:

compilervars.bat intel64 vs2008

If that command succeeds, you are good to go. If not, you won’t be able to compile the Python extension so you should debug that first. In my case, the above command failed. I tracked it down to the fact that compilervars.bat could not see my VS90COMNTOOLS environment variable, which is definitely in my environment. But, for whatever reason, it couldn’t see this variable and so would not recognize my installation of Visual Studio 2008. By hardcoding the right path in to the script, all was well. Then, I was able to python setup.py build and then install my new package, calling Fortran from the Python prompt!


Postgres: How to Really, Really use Tablespaces

I like PostgresDB, but recently I had a very opaque problem. The documentation (eventually) saved the day, but not before filling up the disk holding /var/lib/pgsql/. Oops. Read on to learn from my terrible, terrible mistakes.

Sometimes, when using an RDMS, you end up with more data that you thought you were going to have. You’ve already committed to having your database on some disk, but that disk is not big enough to hold the next chunk of data you need to import. There are a number of options for how to handle this, but we opted to use tablespaces in Postgres, which allow you to keep the ‘home’ for your data in $PGDATA, but put all of the data for a new table in a new directory (presumably attached to some bigger disk) specified for your tablespace.

As long as this new directory is owned by user postgres, you should be good to go. So I happily attempted to create my new tablespace as follows:

CREATE TABLESPACE extraspace LOCATION '/big_disk/data';

Not so fast! Total and utter failure. No matter how many times you chown that directory to postgres, if it doesn’t work the first time, it’s not going to work. How? Why? Why does Linux hate you so much? Why doesn’t this just work so we go back to reading Hacker News while the data imports? Because SELinux.

Security Enhanced Linux, if turned on for your system, will prevent Postgres from using the filesystem in that way unless you explicitly allow it. Assuming you want to create the tablespace in /big_disk/data, execute this command as root:

chcon system_u:object_r:postgresql_db_t:s0 /big_disk/data

Some additional background information on SELinux issues with Postgres is available here. Anyway, now you can create a tablespace with the command above. So, now it’s time to make a table using your brand new tablespace! We had a smaller test table that had a sample of the full dataset, so we just need to create a new table just like the old one:

CREATE TABLE IF NOT EXISTS data_all (LIKE data_some INCLUDING CONSTRAINTS INCLUDING DEFAULTS) TABLESPACE extraspace;

OK, now we can pgimport to our heart’s content right? NO. This is where I went wrong and filled up our production server. That was bad. The key is that, although creating the table this way will indeed start filling up the directory designated for your tablespace, the index (or indices if you have more than one) will still be added somewhere in $PGDATA. So your disk won’t fill up as fast, but if you’re importing a terabyte of data with a lot of rows, you’ll still end up putting a lot of data on your main disk. The solution: at table creation time, you must ALSO specify that each index you create uses the new tablespace:

CREATE TABLE IF NOT EXISTS data_all (PRIMARY KEY (id) USING INDEX TABLESPACE extraspace, LIKE some_data INCLUDING CONSTRAINTS INCLUDING DEFAULTS) TABLESPACE extraspace;

And any subsequent indices must use the new tablespace. If you create a new table inheriting the properties of an existing table, DON’T inherit the indices on the table because they will stored in $PGDATA. Manually create them:

CREATE INDEX an_index ON data_all USING btree (col1, col2) TABLESPACE extraspace;

And with that, your data, your primary key index, and an additional index, will all be stored on your new disk. You’ll only get a few kilobytes in PGDATA per 1 GB block file as Postgres ingests the data. Now, start your massive pgimport and go back to reading Hacker News.